Sabtu, 31 Desember 2011

Happy New Year

I look forward to the start of the new year.
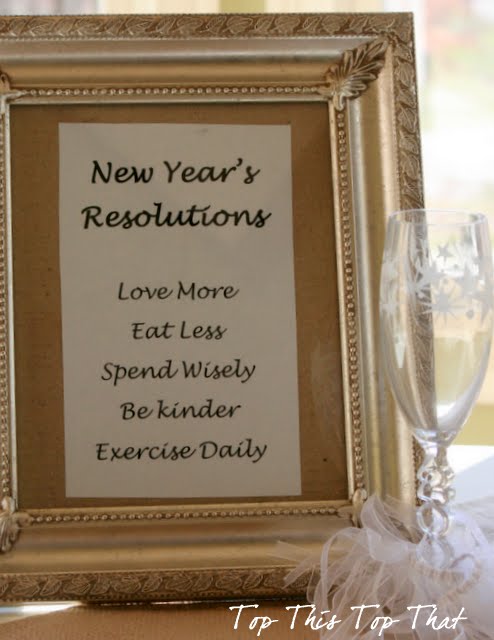
I will try to be more realistic with my goals and ambitions.
I will try to focus on the things and people that matter.
I will try to be a better mom, better wife and better friend.
I will try to reach out more to people who need a hand.
I will try not to have such high expectations and obsess about things that are not more important then my health and the health of my family.
I will try to eat better and exercise more.
I will try to slow down the projects and enjoy my kids more.
I will try to have more date nights with my husband.

I am always reminding my son " You don't have to be the best, just the best at trying".
Happy New Year to all of you. Thank you for supporting my blog and giving me the confidence to Try to inspire you through my stories and pictures. I look forward to 2012.
Cheers!


Kamis, 29 Desember 2011

Another Idea for the New Years Table

Here is a simple but beautiful look for your New Year's table. This look is my favorite as it best represents my overall style and taste.

 On each plate I put a number representing 2012. I used cream and silver dinnerware on top of a natural burlap table runner.
For an extra touch, type up your New Year's resolutions and place in a beautiful frame. This is a good conversation piece at your table. You can also take this idea and place the frame anywhere in the house as a reminder of your resolutions throughout the year.
I made a party hat and placed at each setting. To make, I cut out a hat template ( I used a kids hat) using white cardstock and covered it in burlap. I then embellished the hat by adding silver tulle to the top and bottom.
 Don't be afraid to try different things. This centerpiece was a antique silver bowl tipped upside down with a silver charger placed on top. I added champagne flutes to the center.
Use that same silver bowl to create a beautiful chiller for your champagne and flutes. To do this- Add ice to the bottom of the bowl. Next insert a round mirror or plate on top. To create a stable base the mirror or plate must be wide enough.  Now you are ready to add your bottles and glasses. This idea is much prettier then most ice buckets, don't you think?

I hope you have found some inspiration for your table setting this year. 
Cheers!

Rabu, 28 Desember 2011

New Year's Tablescape Ideas

I 've been working on some ideas on how to dress the table for New Years Eve. Whether it's a romantic dinner for two or dinner for a crowd ( or maybe just dinner in your jammies on the couch) , I hope that I can inspire you to create your own amazing table. 
I cut out a template for party hats in black cardstock. Add baubles and boa feathers and wala!
I used my silhouette machine to cut the letters for "cheers" and "happy" and placed on my plates
Place a silver charger on the base of a lampshade to hold champagne and glasses. Use left over fabric to make napkins and to drape on the table. 
For an extra special touch include a beautiful  photo and frame and include in your tablescape. 
Now you are ready to ring in the New Year!

Senin, 26 Desember 2011

Hard to believe

Hard to believe that something like this
 
  Could maybe one day look like this ......
 
 or like this ......

 My very good friend Patty of PB Designs saw the possiblities in the quills and began using them in her awesome jewelry designs. I asked Patty to describe her beautiful jewelry for you.

 "I try to keep my designs simple and as naturally based as possible.  Many of my beads come from moose and caribou antlers, mastodon, moose and caribou bones, petrified and natural woods, turquoise, jasper and tiger eye beads and porcupine quills.  Most beads come from Alaska.  I also use sterling silver as much as possible.   Glass beads are also used when I feel more color is needed.  "
PB Designs can do custom orders if you would like something specific. If you are interested in any of her pieces contact Patty @ 706-300-6933 or  email me and I can provide additional contact information.


Come On In, My sisters not home

I was so happy to spend the holidays with my family in sunny South Florida.  For several months I have been working with my sister to redesign some of the rooms in her home.While I was there, I was able to take some pictures of the finished spaces that we will be submitting for a feature in a local magazine in her area. This is especially exciting because of the collaborative effort between my sister and I to turn these spaces into something really beautiful. I wanted to share some of my favorite places in her home with you. 
Come on in as I show you around.


My very favorite space in her home is her outdoor living room. This room defines what Florida living is all about. The room is filled with beautiful teak furniture with cushions in cream, soft blues and browns and oranges. 


Next up is her French Country inspired guest room. This lovely room has two twin beds with upholstered cream head boards. A vintage chandelier drapes from the ceiling.  The table between the bed was a local thrift store find and finished in a distressed white color. The lamp is from Ballard Designs.


The final room that I want to  show you is a perfect place to sip some hot tea and read a book. The stunning wooden table in ash with hints of gray is flanked by two wicker chairs. The ottoman between the sofas complements the table. Cream colored sofas and a striped chair in soft blue, tan and brown help to anchor the room.


 I want to thank my sister for letting us have a look around. Opps I almost forget to tell you sis, we helped ourselves to some lunch while we were there.  Hope you don't mind !

Sabtu, 24 Desember 2011

The Gift Was Here All Along


Every year my husband has scrambled around to find the "right" gifts for me.
Each year he has waited till the last minute to purchase the gifts on-line.
Each year he has probably paid more in shipping costs then the gifts were worth. 
Each year he is wrapping his gifts for me the day before Christmas and runs out of paper.
Each year he has to head to a crowded store to purchase more gift wrap.
So this year I sat him down to tell him he was wasting his time and money. The gifts that were on my wish list could not be purchased on-line, did not have shipping costs and did not have to be wrapped. The gifts that I desired and wanted more then anything were the gifts of my precious family, the gift of my loving and caring husband, the gift of our abilty to give back to others, the gift of amazing friends, the gift of our health and the gift of God's presence in our lives.
My hope is that the presents under your Christmas tree this year are the same gifts that I will be receiving.
Merry Christmas to you and the one's that you love.

Jumat, 23 Desember 2011

Welcome To My Home Series- Master Bathroom

This may sound strange but my bathroom is much more fancier then I am. I'm a sweat pants and pony tail chick and my bath is all about a pretty Chandelier. 
 When we built our home there were just two things on my wish list for the master bathroom.The first was the Chandelier. I wanted to create the unexpected and what better place then the bathroom. It's front and center and creates such a statement. 
  
The second wish on the list was a claw foot tub. Hunting down this tub found us in Cleveland, Georgia where we found a  husband and wife team that collect and restore these beautiful old tubs. I ended up spraying the feet of the tub a satin nickel finish and added my own hardware. I feel so special soaking in that tub and try not to think about how it was used as an old watering trough back in the day.
This is my side of the bathroom. Even though I am not fancy and all, I do have a great vanity area to sit and fix myself up. The chair from Ballards, Mirrors from Pottery Barn.
And this is hubby's side. Plenty of room for both of us.
For More of My Home Tour click here

Rabu, 21 Desember 2011

Butler Pantry Transformation

Ever since I refinished my butler's pantry in my kitchen, I am dreaming of painting everything lighter in the house, particularly my kitchen area. I wanted to show a before and after of my butler's pantry transformation. Unfortunately I did not capture pictures of this project in progress. I do know it went through several looks and lots of time in order to achieve what I consider to be a fabulous look and finish.

Before the transformation - originally I painted this piece black and used crackle with a color called White Wheat. The top was rubbed with a dark stain color.


   After the transformation- to achieve this look, I put a white primer on top, and used  a crackle finish with a white flat paint. I used all Behr products. I sanded down the corners to expose the original black color. I finished it off with a coat of wax .
 What will you be painting to lighten up today?


Senin, 19 Desember 2011

Would you think to.......

E 38th St. Painted & Glazed Kitchen traditional kitchen
Add a beautiful chandelier with exposed brick?
Shabby Chic Your Heart Out traditional kitchen
Consider all white cabinets with ebony colored  island?

Avante Interiors traditional kitchen
If you could, put some wood beams on the ceiling?

Old world elegance meets todays todays contemporary space requirements traditional kitchen
Add some open corner shelves?


Hmmm. I hope these ideas provide some inspiration and something to thing about!


Sabtu, 17 Desember 2011

Oh... Out of this World

I admit, I am not much of a foodie and your probably won't see much of it on my blog  unless it can be painted, reconstructed or redesigned. Don't get me wrong, I love it, just can't cook it. 
 I could not keep my eyes off of these cupcakes.  How stunning are they!!! 
Click here for the recipe for these oh tannenbaum cupcakes from BHG. Happy Weekend and enjoy with delight!

Kamis, 15 Desember 2011

Welcome To My Home Series-Master Bedroom

The first room that I wanted to share in my Welcome to My Home Series is my Master Bedroom. I am a firm believer that the bedroom is a place that should evoke peace, tranquility and beauty. These are things that I feel when I am in this space. My room makes me feel special, the way I believe your bedroom should make you feel.

Before kids my style for the bedroom was very  formal. It was not a space for children to jump on the bed or sit on the couch. It was a beautiful space to look at but not to live in. Well all of that changed 6 years ago after my first son was born. I realized I wanted a beautiful space that the family could live in . That's when the formal went and a more simple design was introduced.
Benjamin Moore- Homestead Green
My bedding is the Matine collection from Pottery Barn. The "His" and "Hers" pillows from Ballard Designs, add just enough wimsy and throw in  some casual on a very traditional pattern.  The color on my wall Homestead Green, is the original color choice since we built our home 9 years ago. This is the only color in my home that has never changed. I love this color and how it makes me feel when I enter this space. Calm and Peaceful.  I close the doors and forget the kids are screaming and that laundry is piling up, if just for a moment!Ahhhh.

 For More of My Home Tour Click Here


Selasa, 13 Desember 2011

Holiday Table Runner

In the burlap Christmas spirit I made this holiday runner to put on my table this season. I have always had a hard time finding a runner that was simple but yet festive and I think I accomplished that with this one. This project is super easy if you can sew (fyi-  I am not a sewing master) and  not so easy if you can't, although you could probably use some liquid stitch for your burlap piece and talk someone into sewing your pleated ends in exchange for chocolate!
 Supplies that you will need-
  1. Burlap for the main body of the runner. Amount depends on the size of the runner. For mine, I used 1/2 yard of burlap fabric. My length was 54 inches and my width was 18 inches.   Allow 1/2 inch for seam.
  2. Fabric for the ends of your runner. Amount depends on how many pleats you want. For mine, I used a 1/2 yard of fabric.  
  3. Matching thread for burlap piece and for your end fabric
  4. Sewing machine
First thing you need to do is cut your burlap the length and width of your runner size. You will need to allow 3/4 inch to finish all sides of your runner. Burlap is not as easy to bend and fold so before sewing I used my iron to create my seams. I used a simple straight stitch to finish my edges.The picture below shows my runner with the finished edges.
Next is the addition of your end fabric. I cut my piece of  fabric long so that I could create several pleats. Allow for 1/2 inch  for your finished edges. After pinning your pleats, use your iron to press down the pleats,  this makes it a whole lot easier to sew.
Next you will attach your finished burlap piece to your finished pleated piece. I allowed for 4 inches to attach the fabric to the burlap so that my pleats would "fluff" up a bit.
Once both sides are attached, press the entire runner with your iron to get any of the remaining wrinkles out. Now your ready to place the runner on your table. How easy was that!